No products in the cart.
$0.00
Cart
What is a Print Ready File?
A Guide to Press Ready Artwork
Click to play
What is press ready artwork?
Print Ready (also called press ready) describes any file that is able to meet the specifications required to be setup for final press work and printing.
Download a demo setup file
Click here to download our demo file which illustrates the best practices we outline here.

CarePac's Art Setup Checklist for Designers
If you're preparing artwork for CarePac, either digital printing, flexographic, or rotogravure printing, here is a quick recap of the important points to hit if you want to create print ready artwork:
Outline text: Convert all text to outlines.
Use Vector art: Create all non-photographic text, graphics, and illustrations using vector graphics.
Raster images: Should be at least 300DPI (dots per inch). Link or embed these in the file.
PMS Colors: PMS color are solid pigment colors not a colour mix like CMYK. Refer to Solid Pigment Uncoated Swatch book. PMS colors used with digital printing will not be 100% accurate to the swatch.
Finishes and Effects: Apply a unique off-pallet color to distinguish these areas in the design. Avoid relying on transparency in your design. Also it is best practice to separate designate clear areas in additional panels, see our finish mapping section below.
Bleed: Bleed is not required.
Plate Printing: 10 color stations are available, but we recommend limiting to 8 colours. White ink counts as a color.
Preferred format: Original Adobe Illustrator (AI) or PDF/X-1a.
Canva: For Canva artwork, export both PDF and SVG versions. If possible, share edit access to the Canva project.
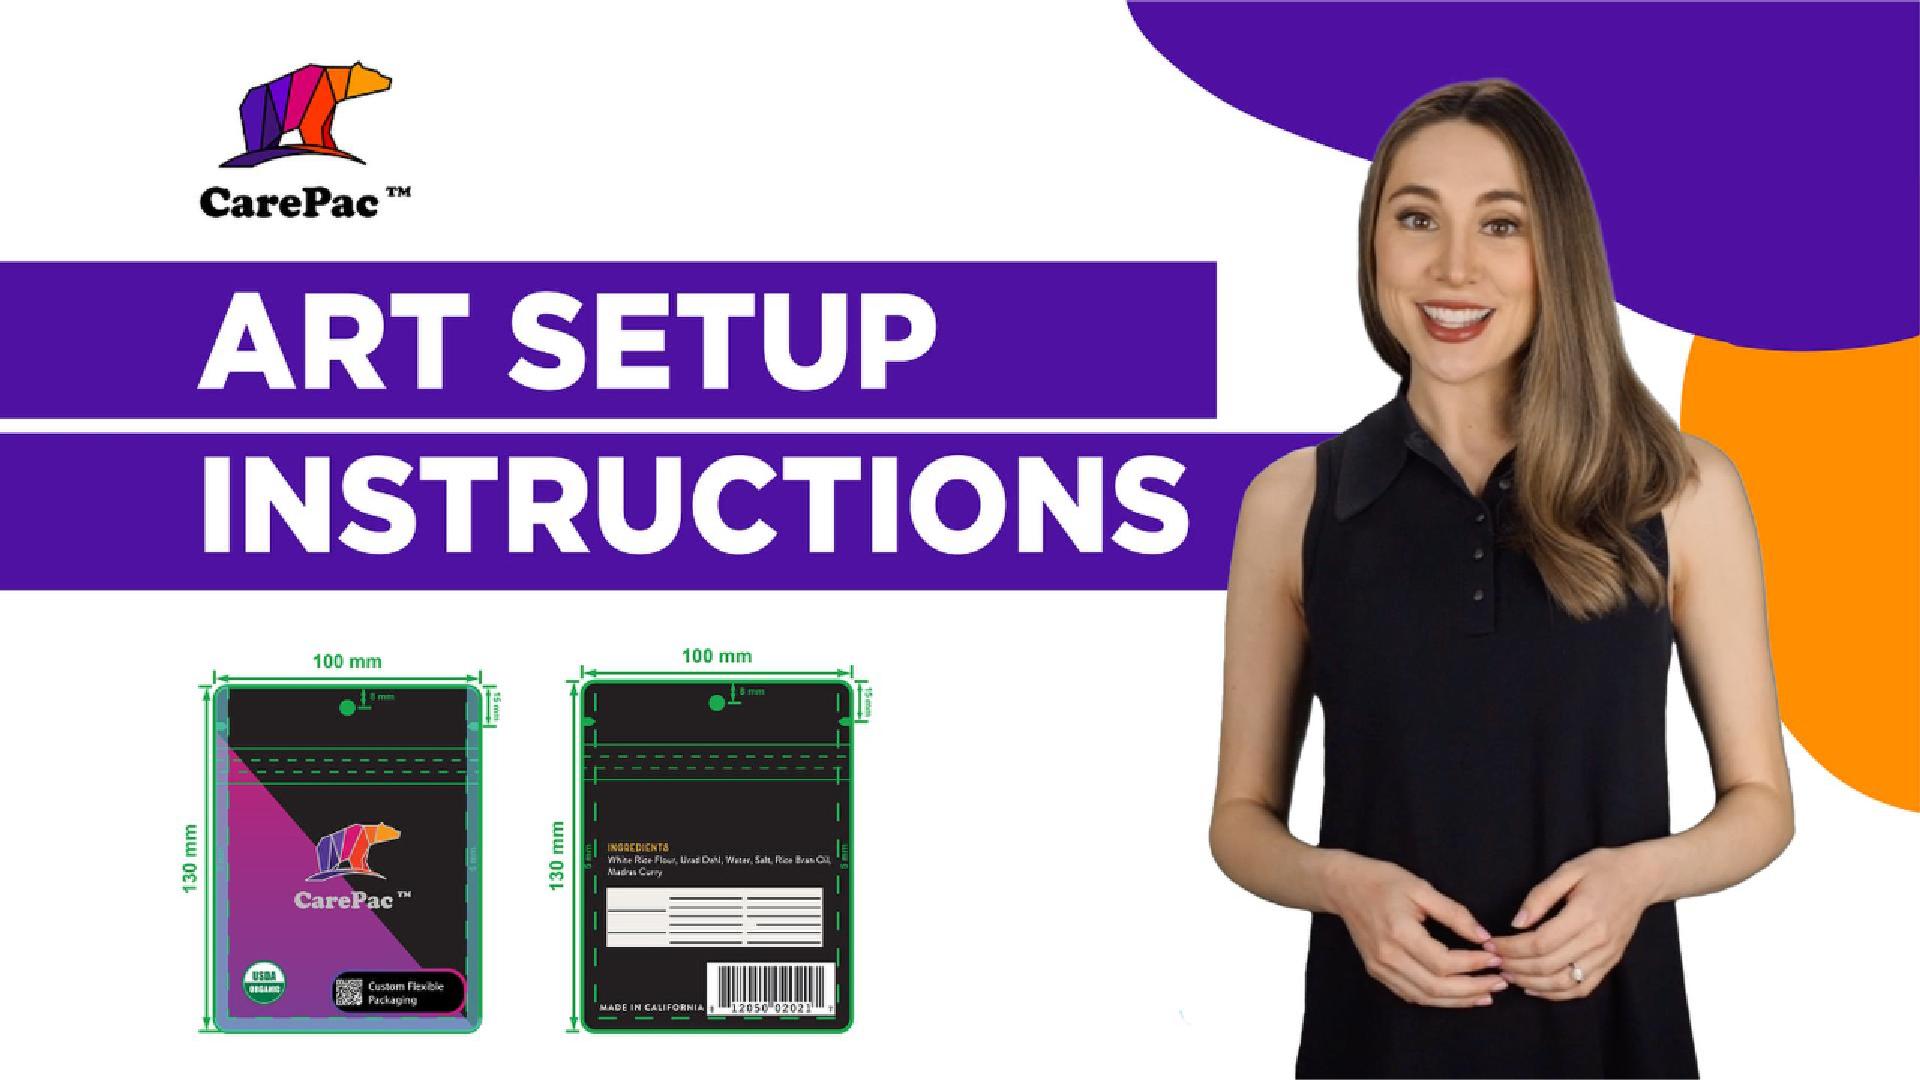
Artwork placement: Place all artwork on the same layer as indicated in your dieline. Do not edit the dieline, add color swatches to the color bar, and remove unused color swatches. Avoid placing critical graphics in zipper areas, seal zones, or around hang holes.

Indicating Finishes, Windows, and Metalized Effects
We recommend using a "finish map" which separates these indications from the printed image and the rest of your graphic design. See below for our specific finish mapping recommendations:
- Clear areas: Use an obvious color that contrasts with the design to indicate any clear unprinted area.
- Finish indication: Use a finish map to indicate type and location of bag's finish.
- Metalized effects: Indicate areas of metalized effects using a separate metalized map. Choose a color for the metalized area. Do not use a gradient color, use a solid color like grey.
Note: Use a distinct color to indicate windows in your design.
File Types and Formats
The industry standard, correct file type for flexible printing is Adobe Illustrator. Unlike some printers who may be more selective about the file formats, like most printers CarePac supports Photoshop (.ps), Illustrator (.ai), Adobe InDesign (In), and Acrobat (pdf) but CarePac's design team can also work with Encapsulated PostScript (.eps), Solid Vector Graphics (.svg), or Canva files. Finally, if all you have is a PNG, JPG or ok print images, we have worked with it all and will work with you.
When in doubt, ask. Knowing the correct file format before starting the design can help you avoid time consuming revisions down the line. For example, CarePac's preferred format is an original Adobe Illustrator file or PDF/X-1a, or PDF and SVG for Canva, but another company may prefer something different. "Print ready" varies slightly from printer to printer, so you'll always want to check.


Artwork preparation (size, resolution, bleed area)
Now that you know you're using the appropriate file type, you'll want to make sure the artwork you're submitting is the correct size and resolution. All logos should be within the Safe Design Area (typically 1/8" inside the die line), and that the resolution of the image if it is a raster is at least 300dpi at 100%. Between 300-450dpi is the sweet spot -- anything too large or too small will print poorly on the final printed file. Trust us, if at all possible provide a vector copy of important elements like a logo, to avoid seeing individual pixels on the final image, so just follow the above steps!
CarePac does not require that you bleed the file you submit to CarePac. But if you are going to add a bleed to your own artwork, we recommend adding a 3mm - 5mm (.125" - .25" ).
CarePac's dieline design checklist
When designing a dieline, you'll want to follow this dieline checklist to make sure you've covered the basics. As always, our helpful team of designers is here to provide their expertise and help guide you through the process.
Type Setting
- Text Formatting: Outline all text.
- Minimum Font Size: Suggested minimum is around 6 pt. Absolute minimums are 3 pt bold for positive text and 5 pt for reversed text (knockout).
- Typesetting Caution: Avoid using Photoshop for typesetting or Smart Objects.


Plate Printing Specifics
- Max Colors: Keep under 8 colors (including white ink). Up to 10 colors can be accommodated with additional charges.
- Line Screen: 177 line screen based on 300 DPI imagery.
- Under 15% Screen: Eliminate from CMYK mix or convert to 100% spot.
- PMS Colors: Reference PMS Swatch books. Be aware of differences between on-screen colors and printed or film colors.
Barcodes and QR Codes Specifications
- Ideal Size: Between 80% and 120%. Avoid truncating the barcode.
- Format: Barcodes should be in Vector line art.
- Ink for Barcodes: Use Pantone Black, or 100% Black.
- QR Codes: Recommended size is 20mmx20mm. Ensure high contrast (white/black).


Vector vs. raster images
So, what's better: raster images or vector graphics? In our opinion, vector graphics are preferred since this type of artwork can be scaled to any finished size without sacrificing image quality. Vector images don't pixelate and it's native to software like Adobe Illustrator, but it does have its limitations. For example, all photographs will be a rasterized image. Our tip is to reserve raster images just for photographs, and build all logos and other graphics in vector format.
Use the correct colors
To ensure you're creating print ready artwork for graphic designers, you'll need to set your file format to CMYK color mode. If using Pantones or spot ink colors, apply them and make swatches. This way, in color separations, if you preview the colors they'll be assigned correctly. Since all printer files use CMYK color space, your colors will change noticeably if they're submitted in RGB. Since RGB and CMYK are two different color builds that don't correspond to each other, it is absolutely essential that your print ready artwork is submitted using CMYK color model.
It is also important to note that the color modes you see on your screen will be different than the color in "real life". Do not be alarmed- this kind of minor variance is totally normal.


Sending your print ready artwork
There are a few different ways you can send us your print ready marketing materials so we can take your print ready art and turn it into a finished printed product via our proprietary printing process.
Package your artwork and send the entire project in one packaged file
Send any raster image originals that are separate from your artwork.
Convert your text to outlines
We recommend attaching your digital art to the email or uploading the vector file using your printing partner's preferred system, as embedding them within the email will cause your high resolution image to degrade. Remember to send the appropriate file formats, whether that's a vector file or raster image.
Print ready artwork: FAQs
Here are some common questions we get from potential customers about artwork types and their print readiness:
What does print ready artwork mean?
Print ready artwork is a file that's ready to be printed as is. It helps maintain print quality, and should take things like pixel density, bleed area, and the design and print quality listed above in mind.
What are some accepted file types?
CarePac prefers to accept files that are high resolution Illustrator art files (AI, we can also accept Corel Draw and some Canva output but Canva often exports Raster image graphics instead of vectors. Many different file types are accepted by different printers, so it's important to check with your printer.
What if my graphics aren't print ready?
If your graphics aren't print ready or are at an unacceptable quality level, our CareDesign team can work with your graphic designer to get your submission in tip top shape shape for printing. While we prefer to only accept art that match our criteria our team of talented pre-press designers are able to fix a lot, we mean A LOT of problematic art, and have developed processes around most any problem you can imagine. So if you just can't get your new project over the finish line, submit it anyways, we're here to help, that's why we're called CarePac!
What are the requirements for print ready art files?
The criteria for print ready art files are laid out in this post, there maybe adjustments depending on some technical print parameters but following these guidelines will help ensure that the artwork designed by your team can be turned into the perfect print. Some things to keep in mind include using CYMK, using vector paths for anything other than photographs, and avoid placing critical graphics along seams or seals.
I need to make a change to the file's dieline, can I edit it?
No, please don't! Never edit dielines provided to you, if you need a dieline adjustment contact our CareDesign team!
Should I add Crop marks or other indicators of off-canvas cuts, or prints.
While we receive artwork with off canvas information daily, there is no need to include this content in your submission.
Are there any special setup instructions for box bottom bags?
Box Bottom bag setup is generally the same as any other pouch. One key difference to keep in mind is that box bottom bags require two separate print runs – one for the Front, Back, and Bottom, and another for the sides.
Note that alignment between side panel print and front/back may not be 100%.
What are the Line screen specifications by color?
- C: 177
- M: 177
- Y: 177
- K: 254
- Spot Color: 254
- Under 15% Screen: Eliminate from CMYK mix or convert to 100% PMS Spot.
What is the recommended trap size?
Typically the CareDesign team will perform all trapping but a good rule of thumb is 0.3mm. If you want to attempt trapping please see this helpful article and video on our site.
What is the recommended trap size?
Well you smarty pants, yes there is!
Dot: Diamond
Min Dot %: 5%
Get started with CarePac today
Our eagled eyed production team is ready to turn your printable file into the final product you've always dreamed of. With a high quality finish, the appropriate colour mix and pixel density, and state-of-the-art printing plates, our graphic design team promises to create the best print using industry standard practices. Plus, we'll do so using your desired print materials. With our handy checklist, preparing artwork and high resolution images for printing has never been easier. You have multiple jobs: leave the designing and printing to us! Contact us today to get started!
Lets Get Started
Made In
The USA
Full Pouch
Customization
Scalable Printing
Digital & Plate
Latest From The Blog
© 2025 CarePac. ISO 9001:2015 CarePac, Family Owned Flexible Packaging
Legal | Capabilities | Privacy